User Guide To Set Google My Business Messaging: Receive Text from Local Search Results
Three Life Changing Business and Leadership Lessons In Less Than 5 Minutes
August 15, 2017User Guide: How To Connect/ Disconnect Facebook Page With Instagram Account?
August 29, 2017A few days back, Google announced about a new feature called, “Google My Business Messaging”. This feature allows you to add a new feature in your local business listing results that will let users send text messages from their mobile devices. Google took an initiative to educate their webmasters by sending an email about the update with steps. However, if you’re not really sure how to add this feature, then here is the step by step guide for you.
Step 1: Open Google My Business Page by clicking on this link: https://www.google.com/business/
Step 2: Click on Sign In button.

This will open a page which will display all your listed businesses.
Step 3: Click on ‘Manage Location’ button for the business for which you want to enable ‘Texting’ Feature’

This will redirect you to ‘Business Editing’ Page of the location.
Please be noted, as of now, this feature is only available for U.S.A. So if your business belongs to any other country, you will not be able to find this feature in the sidebar. No need to panic. Just wait for some more time until this feature gets available in your country.
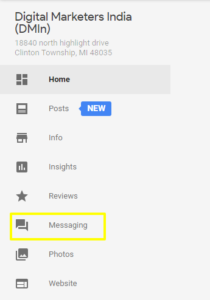
Step 4: In sidebar menu, click on ‘Messaging’ button.

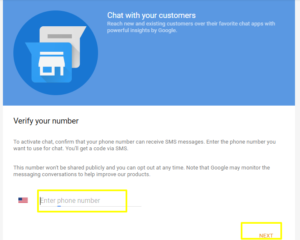
This will redirect you to ‘Verify your number’ page
Step 5: Add phone number in the available text box and click on next. You can add mobile number or text enabled a landline number (text enabled landline number allow you to receive and respond SMS to and from your Landline number). Please be advised, no need to add the country code.

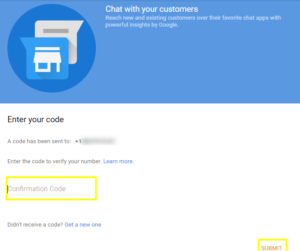
This step will redirect you to the last page of the process.
Step 6: Enter the confirmation code which you have received on your entered number and click on submit.

Once you confirm the code, your business is ready to receive text messages from customers on this verified number. You may also set ‘welcome message’ after verifying the number.
This is it! It is as simple as it reads. If you have any question, feel free to contact us to get more details or leave your questions in the comment section.


